When you plan to setting up an x86 computer from scratch, should be considered the following issues:
In order to verify that the Linux kernel is started with UEFI support you must run this
If the directory does not exist, Linux has not started in UEFI mode.
This waiver is neither problematic: because in my case the interest in using UEFI mode is to be able to boot from GPT partitioned disk, which I can do with GRUB2 without using UEFI mode.
To study in greater detail how to generate GPT partitions check this site.
I use this partition scheme:
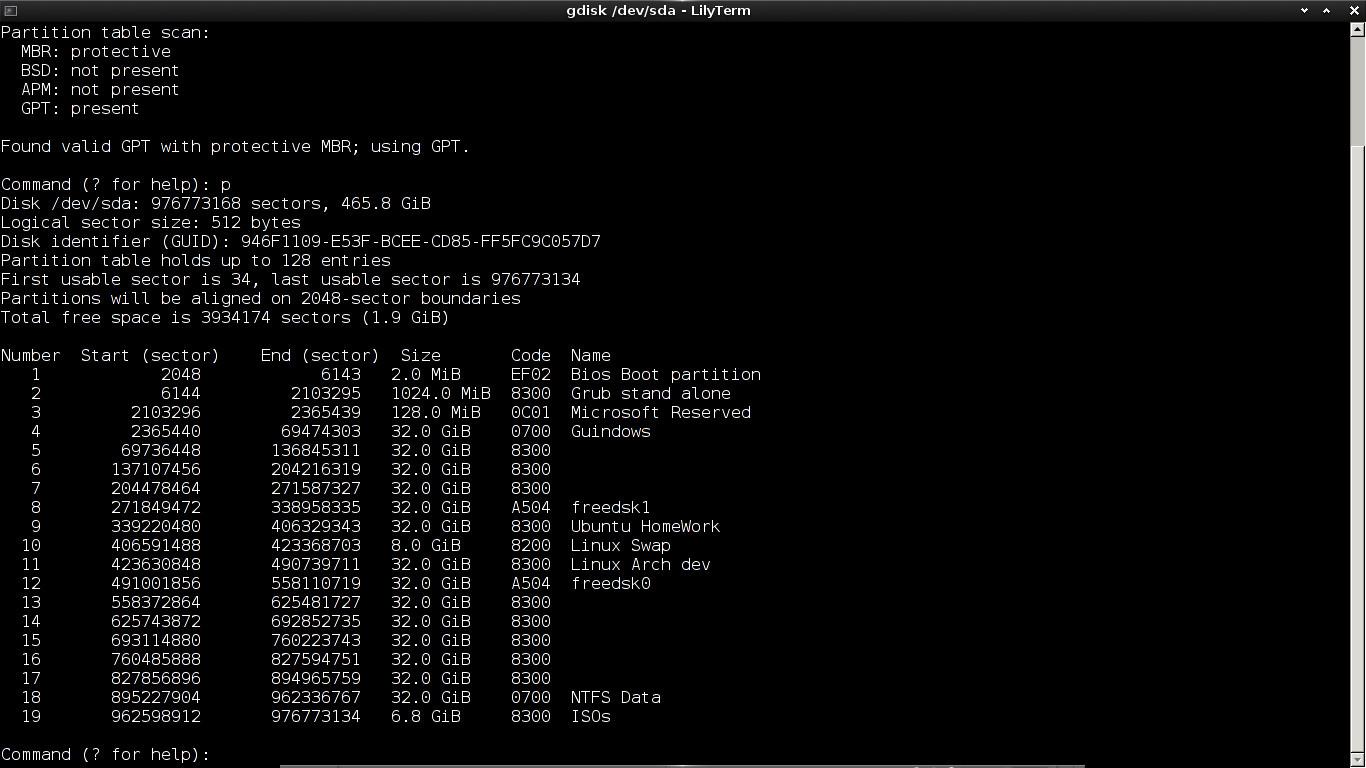
We will review the GPT Partitions Table:

Here you have a piece of my current grub.cfg file. I have to say that although it is recommended to update the file grub.cfg with the command grub-mkconfig, I prefer edit the file manually to add the new entries.
- Whats the computer role?
- it support UEFI BIOS?
- Will be dedicated to a single operating system, or is intended to host multiple OSs?
- Which bootloader is intended to install?.
- How to allocate disk space?.
In my last laptop for testing, I configured a GPT partitioned disk with homogeneous partitions sizes and then have installed GRUB2 as independent bootloader. This configuration allows me great flexibility in allocating storage space and isolates the different S.Os installed.
The choice of GRUB2 is almost obvious, is the default bootloader for a lot of Linux distributions. It reads most file systems, it can boot directly almost all OSs, or chainloading with another bootloader to boot the OS -the last is my preferred option-.
Next, we will review the implementation process I have done.
Choose a Linux Distribution
To begin you must have an iso image of your favorite Linux distribution that leads GRUB2 -almost all- In my case I opted for ArchLinux.Check the BIOS
Another issue to consider is whether the computer has a classic BIOS or UEFI. Its convenient, before to begin to install OSs, be familiar with the BIOS and be clear about the features of it.
Make sure you have the latest firmware update, the UEFI BIOS are plagued with bugs.
In order to install the version of GRUB2 that boot in UEFI mode, you need to start Linux from an UEFI bootloader; therefore you need to check that the UEFI Boot is enabled in BIOS. Also, you need to check from the Boot Menu that the default bootloader -EFI/BOOT/bootx64.efi- is properly detected in the installation media -CD or USB- .
In order to verify that the Linux kernel is started with UEFI support you must run this
: # modprobe efivars
# ls -la /sys/firmware/efi/efivars
If the directory does not exist, Linux has not started in UEFI mode.
In my case I have ruled out UEFI mode for the bugs found in the BIOS of my laptop and the lack of updates.
This waiver is neither problematic: because in my case the interest in using UEFI mode is to be able to boot from GPT partitioned disk, which I can do with GRUB2 without using UEFI mode.
Disk Partitioning
Once running Linux, open a command shell and start creating GPT partitions, for this you can use the commands parted or gdisk. I prefer gdisk.
To define the GPT Partition Table I followed the following criteria:
To define the GPT Partition Table I followed the following criteria:
- Create all partitions before you start installing the OSs.
- Allocate a partition for each OS, where we place the standard directories, and if necessary, use additional partitions for data storage.
- Use uniform sized partitions for OS and data. Case apart are the "special" partitions that I try to place at the beginning or the end of the disk.
- Align the partitions on 4K boundaries. Modern disks has 4KB physical sectors, although at a logical level still presents itself as 512 byte sectors.
- Keep "bubbles" of 128 MB in size of unallocated space between adjacent partitions.
To study in greater detail how to generate GPT partitions check this site.
I use this partition scheme:
 |
| GPT Partition Table |
We will review the GPT Partitions Table:
- Partition 1: is set up as "BIOS Boot Partition" that is used by GRUB2 to contain its second stage for BIOS systems with support for disk with GPT partitions. Alternatively for an UEFI System, assign 200 -256 MB for the first partition, format this partition as FAT32 and finally set it up as ESP.
- Partition 2: is set up as Linux partition formatted as ext2. stores the independent GRUB2 installation and some diagnostic tools that can be launched from the GRUB2 menu, somewhat similar to the ESP partition in UEFI systems.
- Partition 3: This is a Microsoft Reserved Partition that I left ready for future testing.
- Partition 4: is set up this partition as NTFS for future testing of Microsoft OSs.
- Partition 5-9: dedicated to install different OS or for data storage.
- Partition 11: Linux swap partition.
- Partition 12-17: dedicated to install different OS or for data storage.
- Partition 18: this partition was formatted as NTFS, designed to share information among different OS and data storage.
- Partition 19: this is an auxiliary area to store ISO images, or scripts for automating installs.
The Swap Partition
The swap partition requires some additional considerations, traditionally the location and size of the swap were decisions that were quite relevant when installing an OS like UNIX/Linux. Nowadays this is no longer true, because with the large amounts of available RAM and ability to define paging files within file systems, can even dispense with its use.
Placing the swap partition in the middle of the disk is not very aesthetic, as it breaks the harmony of uniform sized partitions, but it has its advantages:
- The first seven partitions should reserve them for boot loaders and OSs that require being in very specific positions of the partition table -Windows, Solaris etc-.
- Moreover it reduces, on average, the distance that the disk heads have to travel to / from the active partition to the swap partition.
- Finally, placing the swap area at the end of the disk penalizes access times, as this is usually the "slower" area of the disk so it should be avoided.
Size of partitions
- In order to maintain the uniformity of the partition sizes, could have configured a 32GB swap, which I think is clearly a waste of space, my laptop has 4 GB of RAM expandable to 8 GB.
Also I could use smaller size uniform sized partitions - eg: 8GB-, but this decision unnecessarily complicate storage management, I think 32 GB is a good compromise to have an OS that it is "functional".
Installing GRUB2
Having defined the partition table, taking special care to define a "BIOS Boot Partition", the next step is to install GRUB2, for this we make the following steps:- Format the partition where will reside GRUB2.
# mkfs.ext2 /dev/sda2
- Mount the filesystem on / mnt.
# mount /dev/sda2 /mnt
- Run the grub-install command with the following options:
# modprobe dm-mod
# grub-install --target=i386-pc --root-directory=/mnt --recheck --debug /dev/sda
- Generate grub.cfg file.# grub-mkconfig -o /mnt/boot/grub/grub.cfg
- Umount and reboot.# umount /mnt# shutdown -r now
At this point, if the GRUB2 Boot Menu appears we can begin to install OSs.
| GRUB2 Boot Menu |
/ / BEGIN OF EXCERPT
/ / END OF EXCERPT### END /etc/grub.d/41_custom ###menuentry "ubuntu 12.10 Home Work" {search --no-floppy --fs-uuid --set=root 619329d2-78bb-4e2a-b834-81d25c847552chainloader +1}menuentry "LinuxArch desarrollo" {search --no-floppy --fs-uuid --set=root a83902d4-e64b-4704-9015-5432acd53474chainloader +1}menuentry "FreeBSD 9" {search --no-floppy --fs-uuid --set=root e68f8f2993d44252kfreebsd /ROOT/r243825/@/boot/zfsloader}menuentry "Memory test (memtest86+)" {linux16 /boot/memtest86+.bin}
There's nothing special here, my approach is to use the standalone installation of GRUB2 to select the OS you intend to start and transfer control to the corresponding loader installed on each partition with the OS.
More details on GRUB2 on this site .
Final thoughts about the installed OSs
All installed S.Os use UUIDs to identify its partitions at startup and specify the mount points in the /etc/fstab. It is a highly recommended method to decouple the identification of a partition of its position in the partition table, so it can, for example, reorder the Partitions Table without affecting the boot process.
Ubuntu
As is well known GRUB2 itself is the default bootloader for Ubuntu, so it seems a bit redundant in this case the approach. You can always add the boot options from the Ubuntu grub.cfg file to the main grub.cfg -eventually requires more management effort-. Alternatively you can replace the command chainloader +1 by the command configfile /boot/grub/grub.cfg. This approach keeps the simplicity of the main grub.cfg file while accessing the options generated during the installation of Ubuntu.Ubuntu
ArchLinux
With this Linux distribution I use syslinux as loader for its simplicity and robustness. Here there is a snippet of the configuration file /boot/syslinux/syslinux.cfg showing the nomenclature to use UUID:
/ / BEGIN OF EXCERPT
LABEL archMENU LABEL Arch LinuxKERNEL ../vmlinuz-linuxAPPEND root=UUID=a83902d4-e64b-4704-9015-5432acd53474 roINITRD ../initramfs-linux.img
/ / END OF EXCERPT
More details on syslinux on this site .
FreeBSD
This FreeBSD installation employs ZFS for the root filesystem on GPT disk. The FreeBSD boot manager itself has 3 components; their own "protective MBR", gptzfsboot that requires a separate partition, of style "BIOS Boot Partition" from GRUB2, and finally zfsloader that loads the freeBSD kernel. The function of the first two components is assumed by GRUB2 that invokes directly zfsloader who manages the freeBSD loading process. You can also load freeBSD directly from GRUB2, although I find the first method more concise and clean. For a discussion of the two methods you can visit this site. For a discussion of the two methods you can visit this site.As a final note, for FreeBSD on ZFS, blkid command incorrectly displays the UUID of the partition, so you should get the UUID from the GRUB2 shell with the command ls.
 |
UUID of the partition on ZFS reported from blkid
|
 |
UUID on ZFS partition as seen from GRUB2
|
This comment has been removed by a blog administrator.
ReplyDeleteI'm unable to generate grub.cfg file. I am getting the following error
ReplyDelete"....../usr/sbin/grub-probe:error:failed to get canonical path of /cow............"
Hey, thanks for your info.
ReplyDeleteBTW, regarding Grub2: I'm using now 10.0-RELEASE on 4k-optimized disk etc., so the only Grub2 configuration/version I finally was able to use successfully to boot THAT 'beast' was Grub2 from sysutils/grub2 FreeBSD port. At that grub2 install directory had to be chosen on some partition OUTSIDE the ZFS pool.
Although I didn't try the very very last Linux versions of Grub, the earlier versions failed to see the zpool created using the last FreeBSD release (but I didn't try the latest linux grub). Even Solaris 11.1 Grub2 version proved useless at it.
Another thing about the FreeBSD grub2 is that it can boot the kernel directly, the menu entry will look like this:
menuentry 'FreeBSD 10.0 on ZFS' {
insmod part_gpt
insmod zfs
insmod ext2
set root=(hd1,gpt2)
kfreebsd //@/boot/kernel/kernel
kfreebsd_module //@/boot/zfs/zpool.cache -type /boot/zfs/zpool.cache
kfreebsd_module_elf //@/boot/kernel/opensolaris.ko
kfreebsd_module_elf //@/boot/kernel/zfs.ko
kfreebsd_module_elf //@/boot/kernel/linux.ko
kfreebsd_module_elf //@/boot/modules/nvidia.ko
set kFreeBSD.vfs.root.mountfrom=zfs:freshpool/ROOT/default
}
The advantage of this method is in NOT using zfsloader, which is cool but not always smart enough.
Thanks again for your blogs, very helpful!
I have a 180GB SSD to which wanted to install Debian testing. it is a legacy(BIOS) motherboard and I will want to know- since SSD alignment importance is paramount, 1mb freespace preceeding first partition(gparted). so, with GPT, my first partition is bios_boot ? of what size?
ReplyDeleteThis comment has been removed by the author.
DeleteYes, the first GPT partition must be bios_boot, with 100 MB is enough. Personally I prefer to use disgk rather than gparted.
DeleteExcellent and clear pathways. Thanks
ReplyDelete